Advisory Note

Please Note: This blog contains poorly painted toy soldiers that may offend those of an aesthetically sensitive disposition.

Friday, 7 April 2023

Another return to Hyboria?


Having discovered yesterday that there is going to be a specific Hyborian variant of the Portable War Game (PW), to be published in the Second PW Compendium (Ed. Bob Cordery), I've pulled out the boxfile of 20mm figures labelled "Hyboria" that I was preparing in 2020 (see Here). Mark Cordone is the author, and I'm really looking forward to trying the game.

I had forgotten that along with painting the Army of Corinthia, I'd also got some way with my Army of Stygia (the country South of the River Styx, full of sinister Set Worshipers). A few pictures follow for anyone who is interested in this sort of thing. The figures are from various manufacturers, some plastic and some metal.


Army of Corinthia - this was in 2020. Another 3 units of foot have been added


Army of Stygia - auxiliaries made of tribesmen from client states to the South of Stygia (Kush, Punt, Darfar etc)


 Stygian Heavy Infantry - the backbone of the Army


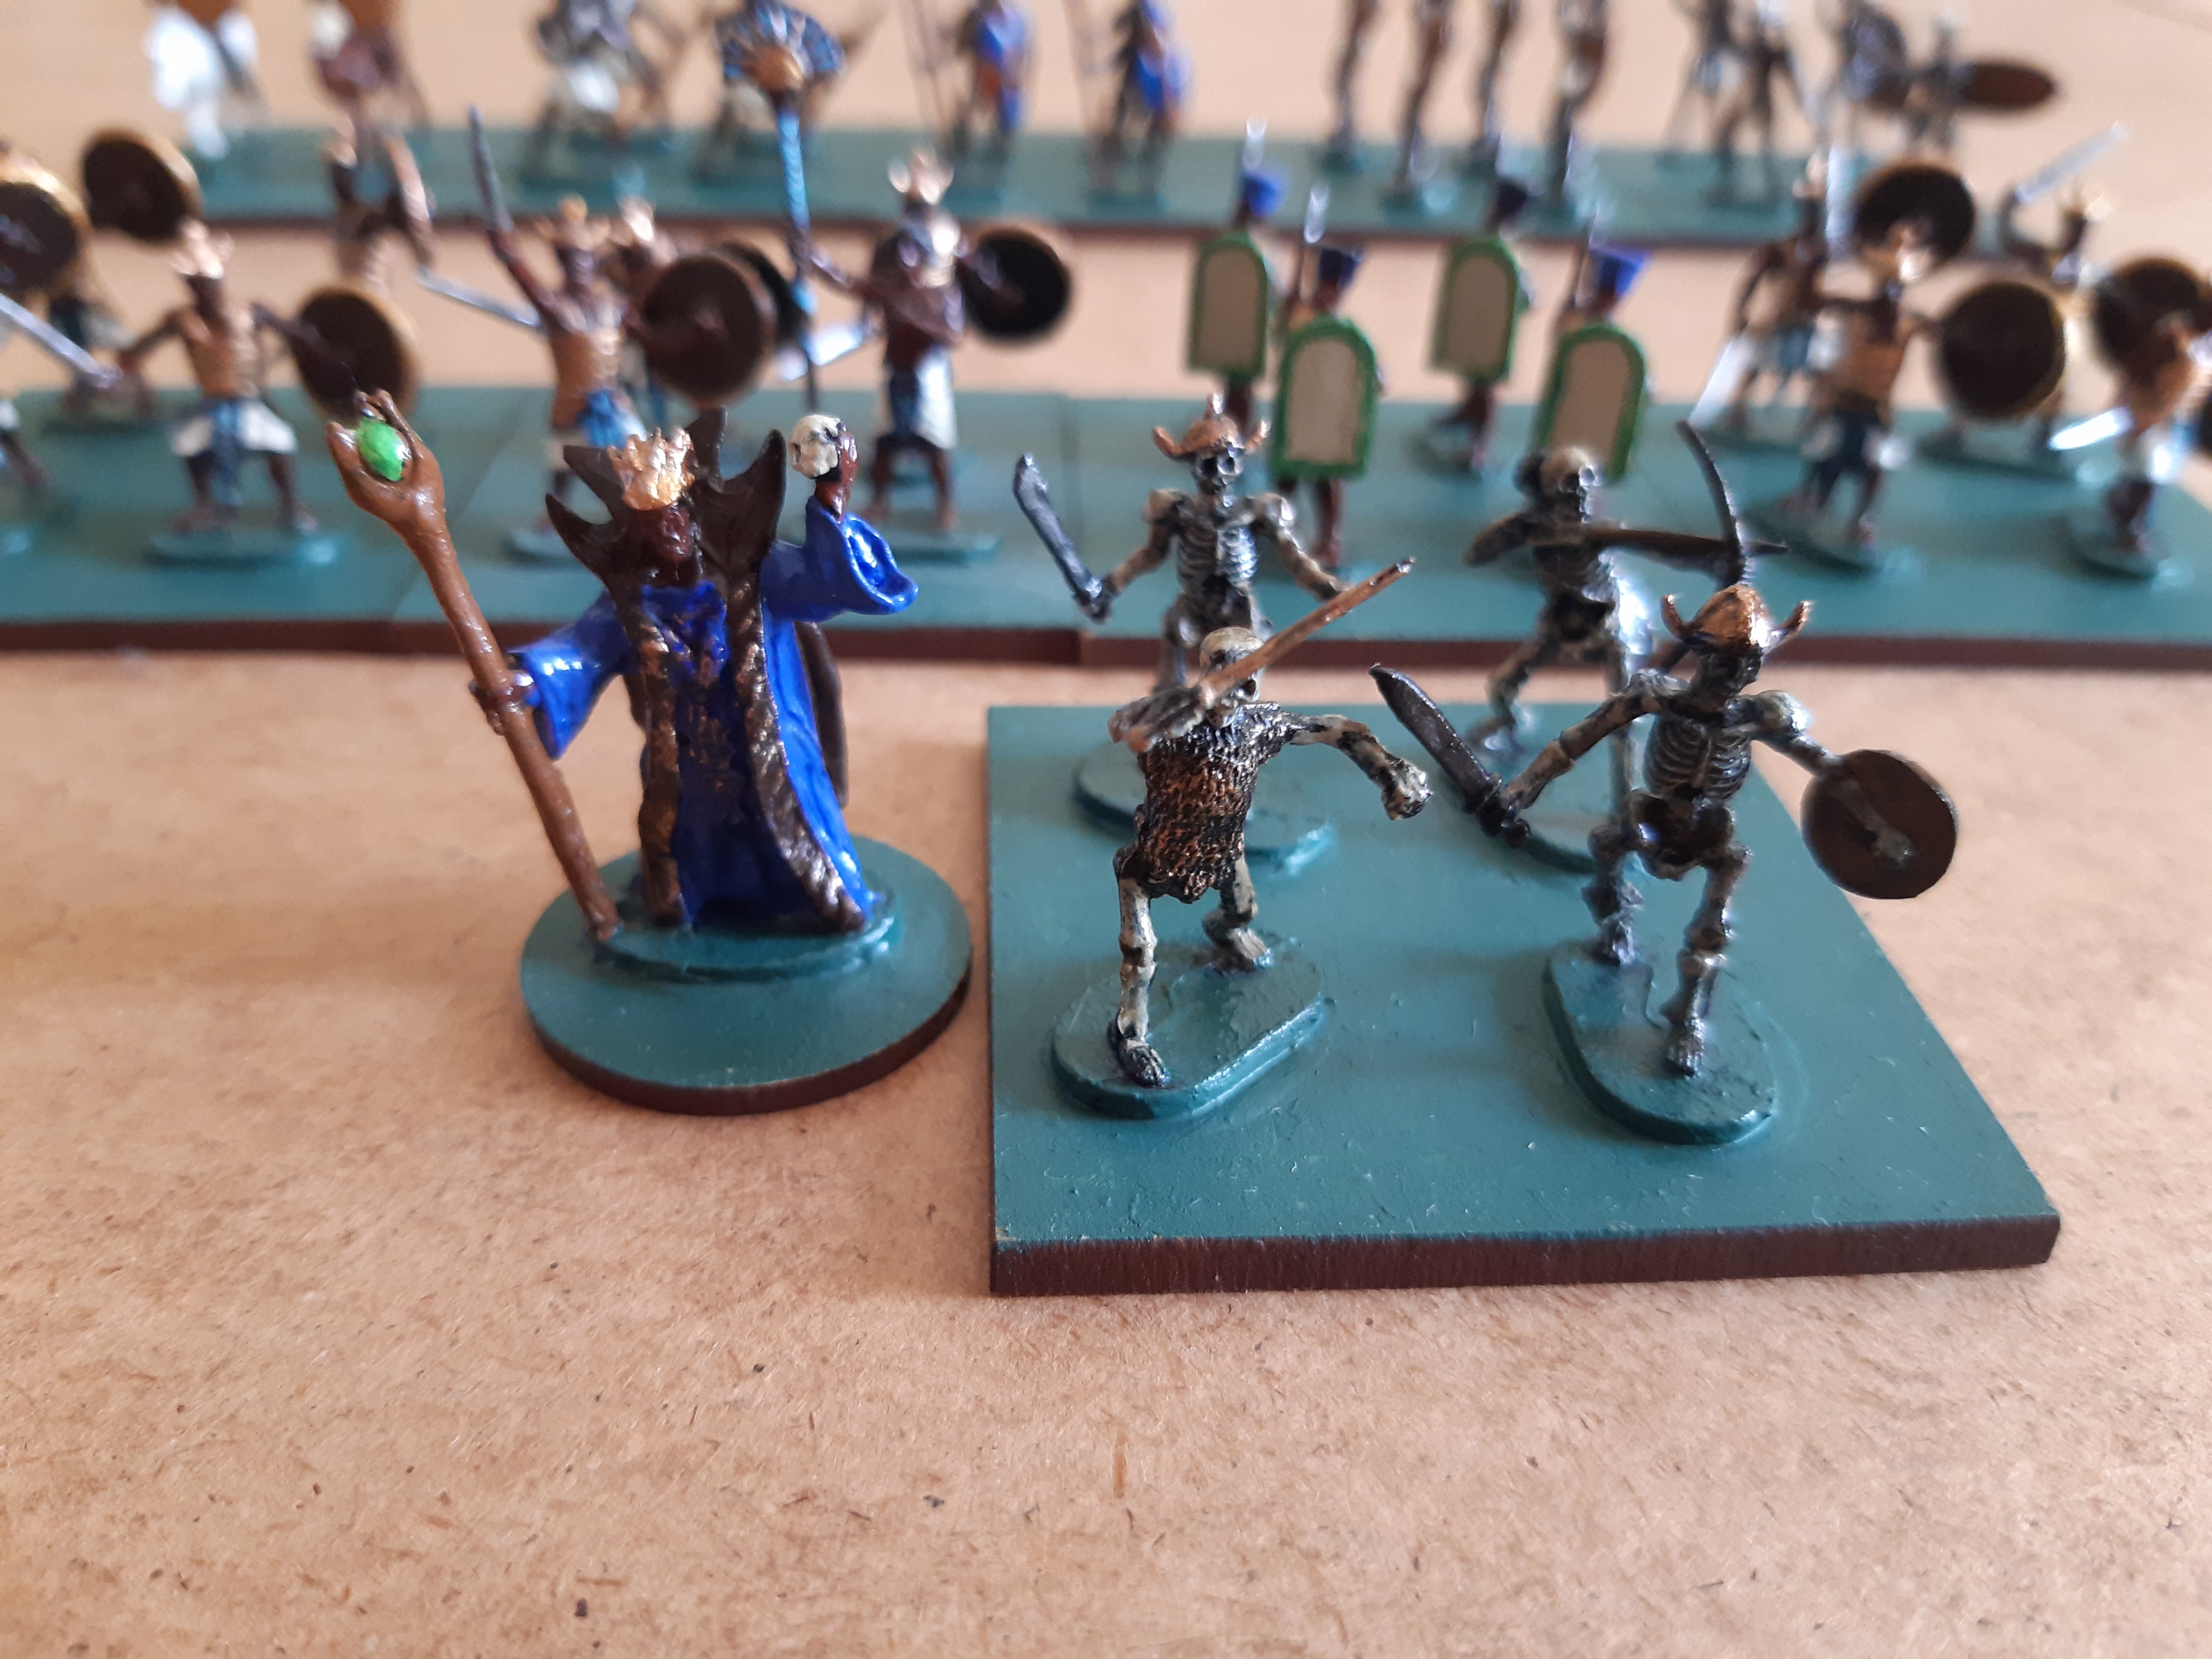
A Stygian Necromancer and "friends" - Robert Howard's Conan stories included a bit of magic though they are more Swords than Sorcery.

Looks like I've got enough for a game!

Thursday, 6 April 2023

Mini Campaign using OHW Scenarios Part 2

 Retreating back to the border after their raid into Red territory, Army Green find their way blocked; they must fight their way home. The successful counterattack by Army Red necessitated the playing of OHW Scenario 13 "Escape". Green must exit at least 3 units by the road to succeed.

Battle 3

At first glance it appears that a single battalion of infantry stand in the way of Army Green.


More units appear on the hill as the Green column advances.


And more...


Green's Commander, leading his cavalry, clears the last of Red's infantry from the road. The way is clear. Or is it? A further Red unit appears to replace it.


Despite being shot at from their rear, Green's infantry concentrate their fire forward before their cavalry charge in again to finish off the survivors 


Once again the road is clear and an orderly retreat resumed, giving and receiving fire


Green's escape ended the War. Red was hampered by a lack of cavalry and some terrible dice throwing.

Thanks to Martin Smith for sharing his Mini Campaign matrix which is shown with the permission of its author but remains Copyright M.Smith.


Monday, 3 April 2023

Mini Campaign using OHW scenarios Part 1

 A few days ago Martin Smith kindly sent me the plan of a Mini Campaign he has prepared using Scenarios from Neil Thomas's One Hour Wargames. The following summarizes the first two games with the concluding game to follow soon (I hope).

The Campaign is map-less, so naturally I thought I'd add a map; for colour.


   There has been a diplomatic incident involving the Kingdom of Azez (Red) and the Republic of Ora (Green); both sides have sent troops to the border but in their haste the forces are arriving piecemeal. ( I rolled for a choice of Game 1 from 3 scenarios offered and landed No.17 "Encounter"). For rules I'm using a house version of the Portable Wargame prepared for OHW (there's no Exhaustion Point, to reflect the zero morale rules in Thomas's book).

Battle 1

The sun was barely up over One Tree Hill when the two forces began arriving. Red was the first to get boots (or hooves anyway) on the objective.


Red's troops began appearing each turn and they quickly dominated the hill though the slower arriving Greens persistently attacked.


As evening fell it looked like Red would hold the hill, but as the sun slipped below the horizon, a gallant counter attack from Green stormed the objective. Red was reduced to such a small force that their commander was forced to slip away under cover of darkness or face annihilation. 


Green's victory led them to take a border town near a strategic bridge; controlling both is the key to Scenario 18 "Counter-Attack".

Battle 2A

Red had one unit holding the bridge (the rest of his force would arrive on turn 3). Green held the town and advanced towards the bridge. Due to poor reconnaissance, Green was unaware of the two fords (marked by patches of sand).


 As the main Red Army arrived Green held both of the objectives; the counter attack had to begin at once.

Whilst attacking the bridge, Red made use of the Fords which the Green Commander stubbornly refused to notice, even when he was being fired on by Irregulars crossing the river on one of them.


In a daring move, Red's Commander out flanked Green and personally led an attack, firstly destroying Green's artillery and then attacking the Town Garrison.


Late in the day, both sides had lost their Commanders and casualties were mounting. 

Red held the bridge and the town was surrounded on three sides. This time it was Army Green who were forced to withdraw from the field...


Saturday, 13 August 2022

Battle for the Green Hills

A blisteringly hot day outside so I thought I'd indulge in an indoor activity, and what better than a game using some Portable Wargame variant rules of my own; to wit Swords, Sorcery and Squares (published in Bob Cordery's PW Compendium).

A simple pitched battle was set up with an army of men commanded by Count Enarriere faced by an invading army of Darkness led by Lord Nul (a Lord of Chaos).

Army of Count Enarriere

General/Hero The Count 6SP
His Wizard, Fiddlestix, 2SP 
Knights of the Green Shield 4SP
3 units of Men at Arms 4SP each
Archers 3SP
Levy 3SP
Total 30SP Exhaustion Point 15SP

Army of Lord Nul

General/Hero Lord Nul 6SP
His Wizard, Gargolous 2SP
Wolf Riders 3SP
Troll 5SP
Orc Archers 3SP
Dead Warriors 4SP
Orcs 4SP
Goblins 3SP
Total 30SP Exhaustion Point 15SP

Both Wizards had the potential use of 3 spells. Fiddlestix armed with Lightning Strike, Shield and Banish Undead; Gargolous with Fire Ball, Fear and Raise the Dead.

The two forces advance both opting to put their Wizards uphill for extra range


The battle begins

Intense fighting on the left flank involving the cavalry and in the centre saw the Army of Darkness suffering the heaviest losses, however they were yet to commit either the Troll or Lord Nul and his Dead Warriors.

Fiddlestix gets close and banishes some of the Dead Warriors 

The battle rages on

The two opposing Wizards blast each other over the heads of the fighting troops

The Army of Darkness reaches Exhaustion Point

On the flank, and unrecorded, the Knights of the Green Shield have defeated the Wolf Riders and attack the Troll.

The Troll falls back

The Wizard Fiddlestix banishes the remaining Dead Warriors. Lord Nul fights on alone. 

Night falls and the battle ends - Victory to Count Enarriere

At the start of Turn 15 (last permitted turn) the two Wizards simultaneously blasted each other with Lightning and Fire; both perished!! 
For today at least, Lord Nul has been defeated and retreats to his realm on one of the Planes of Chaos. The remaining Orcs and the Troll lumber off into the night.
The magic use was undertaken with varying success. Fortunately it doesn't always work as the spells can be quite damaging!

Monday, 1 August 2022

The War of the Aragon Succession - a mini-campaign

 Very keen to try out Bob Cordery's Napoleonic Campaign rules (see HERE), I set up a quick mini-campaign using part of the Waddington's Campaign Map Bob has re-drawn.

The setting is as follows - The King of Aragon has died leaving two potential candidates for his throne. The preferred candidate for the nobility of Aragon is the dashing Prince Carlos, soldier, duelist and all round good huevo. The other candidate, Prince Alfonso, is related to the King of Francia, and is definitely from the very shallow end of the gene pool (almost the foot bath). Tensions between the two Kingdoms rise and both mobilize their forces.

Armies of Aragon (left) and Francia (right) encamped

Francian forces cross the border and war is declared

The first clash of armies - Aragon army 4 v Francia army 2

Battles were fought using 3x3 PW rules. General's on both sides were instructed to watch attrition rates and withdraw where deemed prudent.

Battle 1
In the first battle, Francia's Army 2 (blue) quickly sent Aragon's Army 4 (yellow) into retreat. They holed up in the nearest town whilst the Francian's camped outside.

Further map moves led to a clash between the two Army Threes


Battle 2 

In the second battle casualties on both sides were a little higher but again the force from Aragon backed out first. Once the Francian Army had patched up the wounded and collected the troops who had wandered off, the General ordered a pursuit of the enemy!

Army Threes clash again!


Battle 3

Despite their reduced size, the two armies fought hard, but once again Francia prevailed. Aragon now had two armies licking their wounds inside city walls. Francia's Army Two was pinning down one of these, whilst their Army Three had withdrawn. This left Army Four fresh and heading for the Capital.

Aragon's Army Two rushed off to stop Francia's Army Four heading for the capital


Battle 4

The fourth battle saw Aragon desperate for a victory and fighting with little regard for loss. As the attacking side I deemed it necessary for Yellow to push Blue off his baseline at some point. With the woods on their left flank however Blue stoically held their ground despite great loss. At the end of the day Yellow withdrew his remaining troops. He had damaged the Francian force sufficiently to slow down their march on the Capital, however with 4 straight defeats the War was lost and the Nobles of Aragon sued for peace.

Please note I played a fast campaign with the minimum of record keeping and didn't worry about recording the days / months. 
The rules worked well and I can imagine a more structured approach to the system with more time given to battles and records creating a really enjoyable campaign. 
I note that since I started typing this Bob has posted changes to the rules!! C'est la guerre.


Wednesday, 27 July 2022

Other People's Swords, Sorcery & Squares - Part the Second

More pictures of a game using Swords, Sorcery & Squares* (and a report) were sent to me some time ago by Martin Smith. I have posted a selection of the pictures of Martin's very nice 15mm figures, and the report text.

(*the rules were published in Bob Cordery's Portable Wargame Compendium).


For this, my second try of the fantasy rules, I used scenario #1, Pitched Battle from One Hour Wargames (Neil Thomas). Up until now I’d played 28 of the thirty scenarios but had dodged this one, (something of a head to head crunch), in favour of the more interesting ones. However, this seemed an ideal opportunity to try it out (and cross one more off the list).

Terrain consists of an open battlefield between two hills. The forces involved were:-

‘Good’/Light - an alliance of Men, Elves, Dwarves and a friendly giant (plus commander and a level 2 magician). [total 52 strength points, EP 26] 

‘Evil’/Darkness - Orcs, with help from skeletons, a pair of flying beasties (pterosaur-like) and a warband of trolls. Also a commander, Ga-Ruk,  and a Level 1 magic user. [total 48 SPs, EP24].

Randomised deployment led to a tendency for both sides to deploy further west leaving the eastern flanks quite weak, apart from a giant and the trolls.

Battle commenced as the Elves, Men and Dwarves moved off their hill to realign, and then marched forward, while the skeleton masses of the Evil right attacked and the orcish centre left the hill to form a defensive line in front of their war engines.

A significant part of the fighting occurred on the Forces of Light right flank. Their giant and mage advanced against the troll warband, who were rapidly turned to stone by Greytorch, the human magician. The giant then turned inwards on the exposed orcish flank, to be counter-attacked by Ga-Ruk and his bodyguard. The bodyguard were scattered after a long struggle, leaving the giant and Orc commander in a one on one duel, both of them eventually being killed.

Elsewhere flying beasts (pterosaurs) were dropping rocks on men and dwarves, until elvish, human and dwarvish bowmen eventually downed them. The orc war engines were also scoring hits, weakening the dwarven infantry before they met the orcs in combat. 

However, despite losing significant casualties it was the forces of Light who brought the Evil army to exhaustion point first. The remaining orcs and skeletons attempted to withdraw towards their artillery, though some were surrounded, fighting hard as they were cut down.

It was declared a victory to the alliance of men, dwarves and elves, but a bloody one, with the allied troops also brought to exhaustion point as they attempted to mop up the enemy.

Losses:-

‘Evil’ - 35 SPs, inc. their commander, three units of orc infantry, one of skeletons and both flying beasts.

‘Good’ - 27 SPs, inc. the giant, and two infantry units (men and dwarves).


(All pictures and text are Copyright Martin Smith.)


Saturday, 23 July 2022

The Peasants are revolting (like it's 1381)

 I've been play-testing another skirmish rule-set for the 3x3 Portable Wargame and the result is it sort of works, but I need to make a few additions/clarifications.

Here's a few pictures of the fun:

1 figure = 1 person (1 tree = 1 tree etc)

The peasants who toil away for Sir Richard D'Astard-Leigh have revolted against his tyrannical rule. A number of them find him out and about with his Sergeant (lets call him Wilson), and his Reeve (he isn't named, which does not auger well for him).

The Reeve is fighting two peasants and isn't going to last long

 
Sir Richard despatches a peasant...


and a few more. The last fellow legs it. The revolt is over.


A bit of work to be done on the rules which are an extension of the ones tried back in February (HERE).